Metal 3D Graphics Part 2: Animated Uniform Data with Synchronization
27 Jul 2018Recap
In the previous post we setup the necessary basic code to render a multi-colored triangle using Metal. By doing so we learned about the fundamental concepts of the Metal API:
- A MTLDevice represents the actual GPU.
- A MTLRenderPipelineDescriptor / MTLRenderPipelineState describes what the render pipeline consists of. In particular, this is where we specify what vertex and fragment shaders to use. A
MTLRenderPipelineStateis just a compiled version of aMTLRenderPipelineDescriptor. - A MTLCommandQueue keeps track of many
MTLCommandBuffers that are waiting in line to be executed. - A MTLCommandBuffer represents the entire set of information the GPU needs to execute this pipeline: it contains the pipeline info itself, as well as vertex data and drawing commands that will be fed into the pipeline by the GPU.
- A MTLRenderPassDescriptor is used to configure the interface of the pipeline, but not the interior of the pipeline. It is like the 2 openings of the pipe. For example, a
MTLRenderPassDescriptorcontains information such as the destination resolution to render to. This information is included in eachMTLCommandBuffer. - A MTLRenderCommandEncoder is used to prepare the vertex data and drawing commands that will be fed into the pipeline.
- A MTLBuffer represents a chunk of data which can be accessed by either the CPU and GPU. We used a
MTLBufferto create the vertex data on the CPU, and let the GPU access it in the shader code.
We managed to render a triangle, which looks like this:
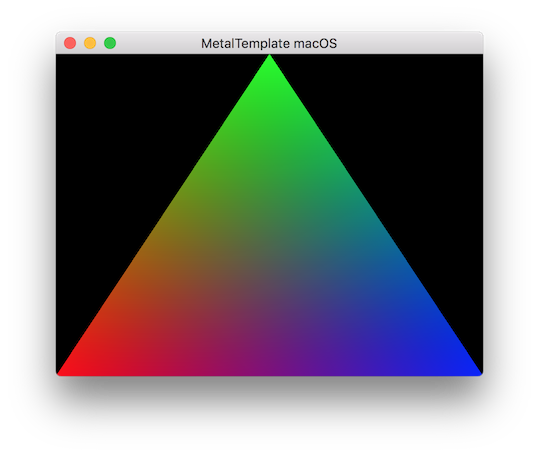
This post will build on top of the last post by adding what is called uniform data (or just uniforms) to the rendering process. Use your code from the previous post, or feel free to download my code and use it.
What is a uniform, and what is it good for?
Right now we can render a triangle, but the output of the rendering is always identical. Having the rendering output be different each frame is necessary for almost any real-time graphics application: for example, every 3D video game needs to move the camera around. In future posts we will actually look at moving the camera around in a 3D scene, but for now we will settle for something more modest; a triangle that changes brightness overtime:
Let's brainstorm how we could accomplish this effect. We currently have a MTLBuffer that contains the vertex data for drawing the triangle. Each vertex data contains the position and color. The vertex data we currently have in it is:
| Color | Position |
|---|---|
| (1, 0, 0, 1) | (-1, -1) |
| (0, 1, 0, 1) | (0, 1) |
| (0, 0, 1, 1) | (1, -1) |
Since we are describing the color of each vertex in this buffer, what we could do is modify the color of each vertex during every new frame. For example, during the second frame we could change the vertex buffer data to:
| Color | Position |
|---|---|
| (0.9, 0, 0, 1) | (-1, -1) |
| (0, 0.9, 0, 1) | (0, 1) |
| (0, 0, 0.9, 1) | (1, -1) |
to make the triangle a bit darker, and so on. Now, this strategy can work, but it's a poor way to go about it. Consider what happens if we have a ton of vertices to render complex shapes. To adjust the brightness of the complex shapes we would need to change the color data for all of the vertices using the CPU. The amount of work the CPU has to do grows linearly with the number of vertices, which is bad news when you want to have a complex scene with lots of vertices.
We can instead achieve this effect by modifying our shader code to make it a bit more general. How can we mathematically make a color darker or brighter? Since bright red is (1, 0, 0, 1) and the darkest red (that is, pure black) is (0, 0, 0, 1), we can simply multiply our color by a number between 0 and 1:
\[
\tilde{c} = c \cdot brightness, \;\; brightness \in [0, 1]
\]
For example, if \(c = (1, 0, 0)\), and \(brightness = 0.9\), then the final color output would be the almost fully-bright red \(\tilde{c} = (0.9, 0, 0)\).
Now, this \(brightness\) variable is what we call a uniform. Like vertex data we use it in our shaders to affect the final pixel color, but it is uniform across all the vertices. While there are 3 vertices, each with different position and color data, there is only 1 \(brightness\) value. I like to think of it as a knob on the control panel of our shader: our shader will take in the vertex data and accordingly render a triangle, and the \(brightness\) know provides a way to adjust the brightness of the rendering output. And who is responsible for turning the knob? The CPU is.
Each frame the CPU can update the brightness, a single floating point number, to affect the rendering of the entire triangle. Much more efficient than modifying every vertex's color data!
Adding uniform parameters to the shader code
Enough talk, let's get on with the code! We will start by first adding the code for our brightness uniform to the shaders. In pseduo-Metal-code, we want to write something like this for our fragment shader:
fragment float4 fragmentShader(VertexOut interpolated [[stage_in]])
{
    return brightness * interpolated.color;
}
However, this isn't quite right for 2 reasons: the first is obvious, we need to define the variable brightness. The second reason will be discussed soon. So how do we define brightness? That is, how does the CPU pass data (the value of brightness) to the GPU? It works in essentially the same way as vertex data: we use a MTLBuffer on the CPU side, and a [[buffer(0)]] on the GPU side, just like the vertex buffer data that is passed to the vertex shader. First, crack open ShaderDefinitions.h and add the following struct definition:
struct FragmentUniforms {
    float brightness;
};
This is a struct that will hold all of the uniforms that will be passed to our fragment shader. Right now it only contains one uniform, brightness. Then we can add it as a buffer parameter to the fragment shader, and use the brightness member of the struct to do the multiplication:
fragment float4 fragmentShader(VertexOut interpolated [[stage_in]], constant FragmentUniforms &uniforms [[buffer(0)]])
{
    return float4(uniforms.brightness * interpolated.color.rgb, interpolated.color.a);
}
While this code isn't entirely foreign looking since it is similar to the vertex buffer parameter, there are some differences to walk through. Most importantly, we declare the buffer parameter to be constant instead of device because each pixel that is rendered will access the same memory location of the buffer (just the since brightness member). We also have the parameter be a reference (&) instead of a pointer (*). They are quite similar and both perform the role of referencing a location in memory, but references can't be used to reference an array of structs, just a single struct. We will not have an array of FragmentUniforms, unlike for the vertex buffer where we did have an array of 3 Vertex structs. Since we don't have an array here, we are free to use either a pointer or a reference or a pointer.
Finally, the multiplication is a bit more convoluted than just doing uniforms.brightness * interpolated.color. This is because the colors are in (r, g, b, a) format, and we want to make the color darker by decreasing r, g and b, but we want to leave a (the alpha value) alone. So we grab just the rgb components of the interpolated color, multiply those by uniforms.brightness, and repack the result into a float4 with the original alpha value.
This is all the shader code we need to write. If we run this now, we get the following crash:
validateFunctionArguments:3332: failed assertion `Fragment Function(fragmentShader): missing buffer binding at index 0 for uniforms[0].'
This is perfect, Metal tells us directly that the fragment shader is expecting a buffer to be bound at index 0, and we didn't do that yet. Let's get to it!
Creating and binding a uniform buffer
Open up Renderer.swift, and first define a new buffer in the class:
let fragmentUniformsBuffer: MTLBuffer
Now in the initializer we need to setup this buffer. The buffer will contain the data for only one FragmentUniforms struct, so we don't use an array but just a direct pointer. Add this below the initialization of the vertex data buffer:
// Create our uniform buffer, and fill it with an initial brightness of 1.0
var initialFragmentUniforms = FragmentUniforms(brightness: 1.0)
fragmentUniformsBuffer = device.makeBuffer(bytes: &initialFragmentUniforms, length: MemoryLayout<FragmentUniforms>.stride, options: [])!
It's important to note that initialFragmentUniforms is just a temporary instance of FragmentUniforms: we create it and then copy the data of it into the fragmentUniformsBuffer, but once the initializer finishes, the actual memory of initialFragmentUniforms will be gone forever.
Side remark about mutability in Swift: we need
initialFragmentUniformsto be mutable (usevarinstead oflet) since a pointer of it is passed tomakeBuffer(...). Metal could modifyinitialFragmentUniformsvia this pointer, so we have to markinitialFragmentUniformsas mutable. Of course Metal doesn't do this, it just benignly copies the data somewhere else, but Swift doesn't know that.
Now we need to bind our fragmentUniformsBuffer to the fragment shader. Just like the vertex data, we perform this binding every frame using the renderEncoder. Inside draw(in view: MTKView) we currently have the code:
// What vertex buffer data to use
renderEncoder.setVertexBuffer(vertexBuffer, offset: 0, index: 0)

// And what to draw
renderEncoder.drawPrimitives(type: .triangle, vertexStart: 0, vertexCount: 3)
This is where we bind the vertex buffer to the buffer at index 0 in the vertex shader. We do the same thing, but with the fragment shader and fragment uniforms by adding the following line before the drawPrimitives call:
// Bind the fragment uniforms
renderEncoder.setFragmentBuffer(fragmentUniformsBuffer, offset: 0, index: 0)
And now, if we run the app, we get a triangle that looks identical to before. It is the same as before since we used an initial brightness of 1.0. We can quickly test that brightness actually works by manually changing the initial value from 1.0 to 0.5, which should give a darker looking triangle:
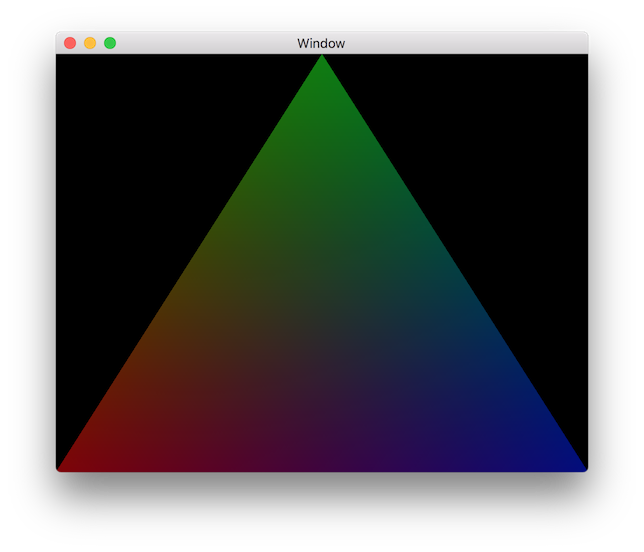
Once you are done experiment with it, set the initial value back to 1.0.
Animating the brightness
Keeping track of time
Right now we have uniform data being initialized on the CPU, and passed to the GPU. But what we really want to do is animate the brightness of the triangle, which means we want to modify the brightness uniform on each frame. The first thing we need to do is start keeping track of time, so that we can base the brightness off of the current time. Our strategy is:
- Keep track of our app's time with a variable
currentTime. - On each frame compute the difference in time between the current frame and the previous frame. To do so we will have to store the system time of the previous frame in a variable
lastRenderTime. - Use the time difference to update
currentTime.
We start by adding these instance variables to the Renderer class:
// This keeps track of the system time of the last render
var lastRenderTime: CFTimeInterval? = nil
// This is the current time in our app, starting at 0, in units of seconds
var currentTime: Double = 0
Now at the top of draw(in view: MTKView) we compute the time difference, save the system time to lastRenderTime, and then use the time difference to update the state:
// Compute dt
let systemTime = CACurrentMediaTime()
let timeDifference = (lastRenderTime == nil) ? 0 : (systemTime - lastRenderTime!)
// Save this system time
lastRenderTime = systemTime

// Update state
update(dt: timeDifference) // TODO: We need to implement this function!
Updating state
Now we just need to implement this update function to update the currentTime, and change the brightness:
func update(dt: CFTimeInterval) {
    let ptr = fragmentUniformsBuffer.contents().bindMemory(to: FragmentUniforms.self, capacity: 1)
    ptr.pointee.brightness = Float(0.5 * cos(currentTime) + 0.5)

    currentTime += dt
}
First, we access the memory location of the uniform buffer via .contents(), and then tell Swift to interpret the memory location as a pointer to a FragmentUniforms struct (which it is). Then, we write to the brightness field, setting the brightness to be a cosine wave based on the current time. Using a cosine wave makes the brightness start at 1, and then smoothly animate between 1 and 0:

Finally, we update the currentTime by adding the time difference. If you run this code now, you should see exactly what we were hoping for, a triangle with smoothly animating brightness:
Synchronizing the CPU and GPU
Unfortunately, the code we currently have is subtly bugged. The output looks fine, but there is actually a race condition that may or may not manifest itself in the future. It's actually an easy fix, but we need to understand what is happening in terms of CPU and GPU coordination.
Each time draw(in view: MTKView) is called (60 times per second), we use the CPU to update the uniform data, and then tell the GPU to go and render using that uniform data asynchronously. Let's lay the rendering of the first 3 frames in a timeline:
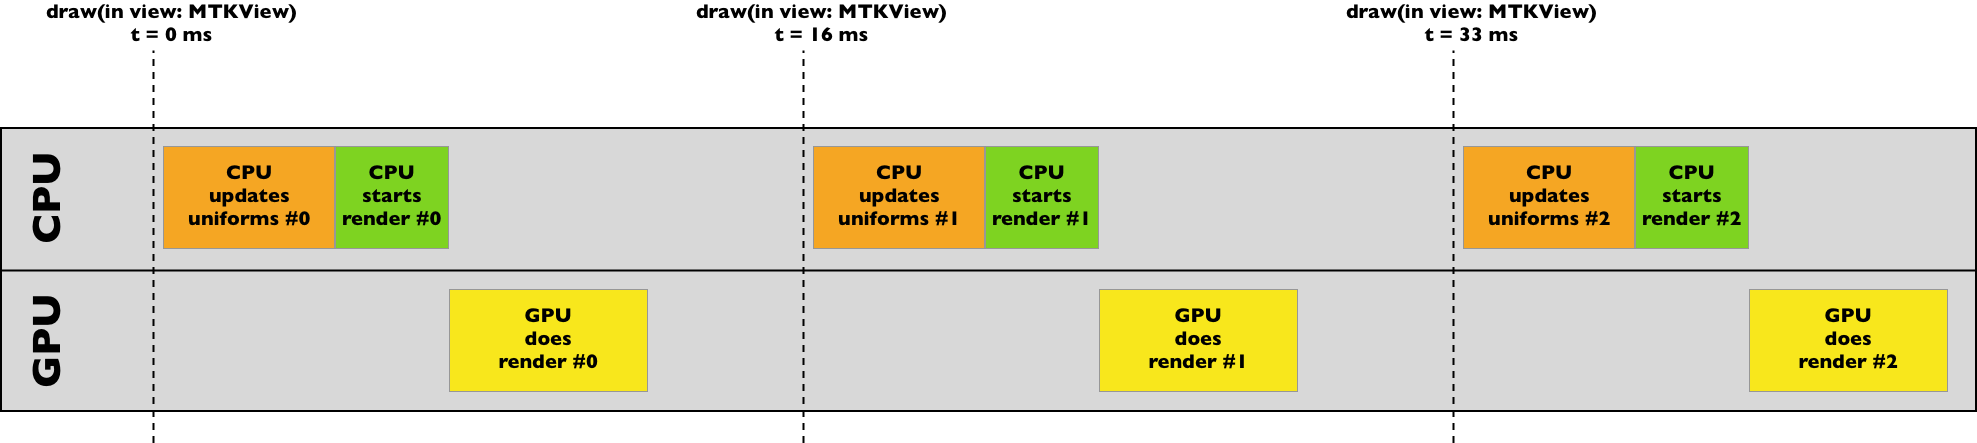
This is fine, and there are not really any problems with this. But what happens if our rendering starts to take too long? Something like this:
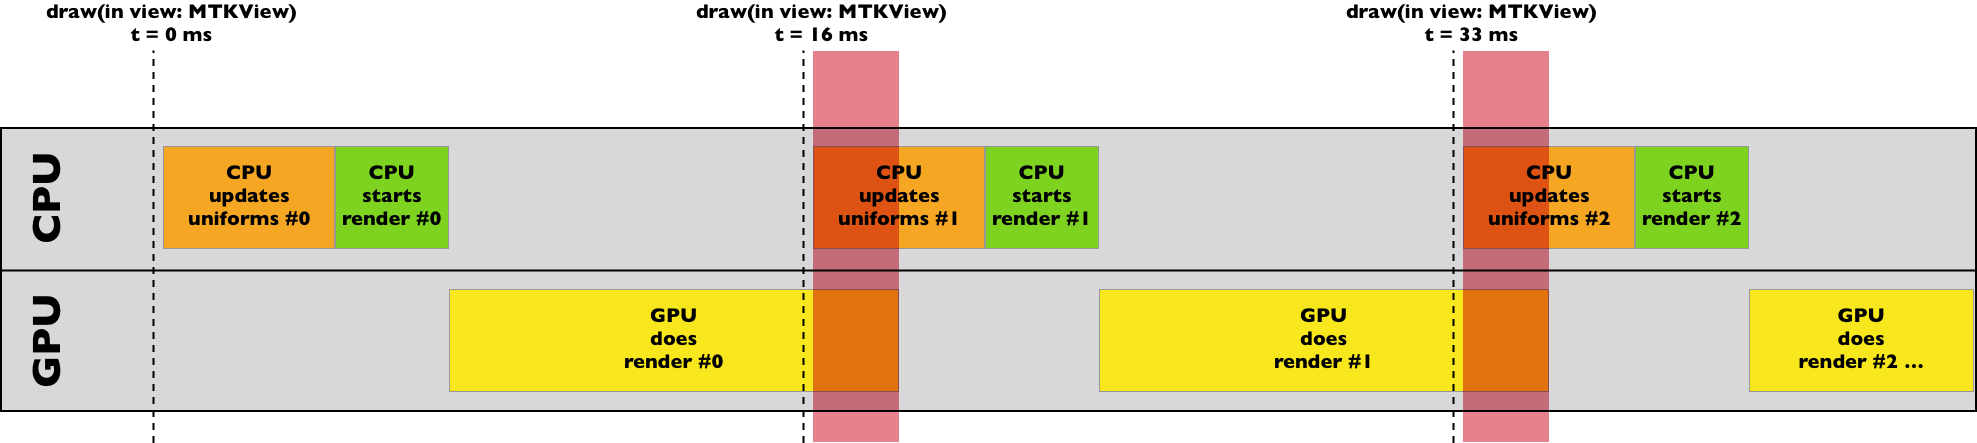
In the red highlighted areas, there is a big problem. The GPU is reading from the uniforms buffer while the CPU is simultaneously writing to it (remember, they both share the same physical memory). What exactly will happen here is anyone's guess: it could crash (though this would be far too forgiving), subtly introduce incorrectly rendered pixels, or have no visible effect. It's hard to predict, and hard to track down later. Ignoring this bug that isn't immediately affecting us is the embodiment of this meme:

(Image credit: KC Green, The Nib). The solution is to synchronize the CPU and GPU. What we want to ensure is that the writing to the uniforms buffer by the CPU can not overlap with the GPU's rendering. We accomplish this by using a semaphore. Let's code it really fast, and then explain how the code works. Add this instance variable to the Renderer class:
let gpuLock = DispatchSemaphore(value: 1)
This creates the semaphore we will use. Then at the very top of draw(in view: MTKView) add:
gpuLock.wait()
Finally, just before commandBuffer.commit(), add:
commandBuffer.addCompletedHandler { _ in
    self.gpuLock.signal()
}
That's all the code we need to add. Let's walk through how this exactly works. We first initialize the semaphore with a value of 1. Then, when we call wait one of two things happen:
- If the semaphore value is greater than 0, it is decremented by 1, and execution continues.
- If the semaphore value is 0, then the CPU waits until the value is greater than 0, after which it will decrement it and continue executing.
So when draw(in view: MTKView) is called the first time, the value is 1, so wait changes the value to 0 and moves on. We then update uniforms and encode the drawing. Before the GPU starts drawing (commandBuffer.commit()), we add a completion handler that will call signal when the GPU is done drawing. All signal does is increment the semaphore's value by 1.
This means that the next time draw(in view: MTKView) is called the CPU will wait to start modifying the uniforms until the previous rendering is complete, which ensures that we do not read and write to the uniforms simultaneously.
The problem of enforcing synchronization between the CPU and GPU is not unique to uniform data: anytime that one of them is reading and the other one is writing (or they are both writing), then you must enforce synchronization. This is almost always the case with uniform data, but is not necessarily the case with vertex data. As always, the complete source code is available for download.
Challenges
- We are currently computing the
brightnessusingcos()on the CPU, and passing this to the GPU. Instead, try to pass thecurrentTimeto the GPU, and compute thebrightnesson the GPU. - I wrote this post as passing the
brightnessuniform to the fragment shader. But we can accomplish the exact same thing by passing thebrightnessuniform to the vertex shader instead, and in the vertex shader modify the vertex colors before interpolation. Implement it this way instead. - In challenge #2 you achieved the exact same effect by modifying the vertex colors in the vertex shader instead of the fragment shader. Will this always be the case? As an example, try taking the
sqrt()of each RGB color component in the vertex shader and compare to doing it in the fragment shader. Are they identical? - Use a time uniform to cause the triangle to grow and shrink. (Hint: what happens if you multiply the vertex positions by a number less than 1 or greater than 1?)